9 Easy Halloween Nails to Paint at Home
I don’t usually go all out for Halloween, but I do love a set that nods to it. These are the easy Halloween nails I painted this season, all in gel and cured under a UV lamp, from cute pink ghosts to a raised 3D pumpkin.
New to gel? The American Academy of Dermatology’s gel manicure tips are worth a quick read, especially the advice on protecting your hands from UV light.
Easy Halloween nails: quick picks
- Easiest: pink ghosts (#3) or candy corn tips (#6)
- Short nails: tiny bats (#2) or candy corn tips (#6)
- Most dramatic: blood drip (#5) or cat eye moon line (#7)
- Classic orange and black: tiny bats (#2) or checkerboard mismatched (#9)
1. Burgundy nails with a spider web accent

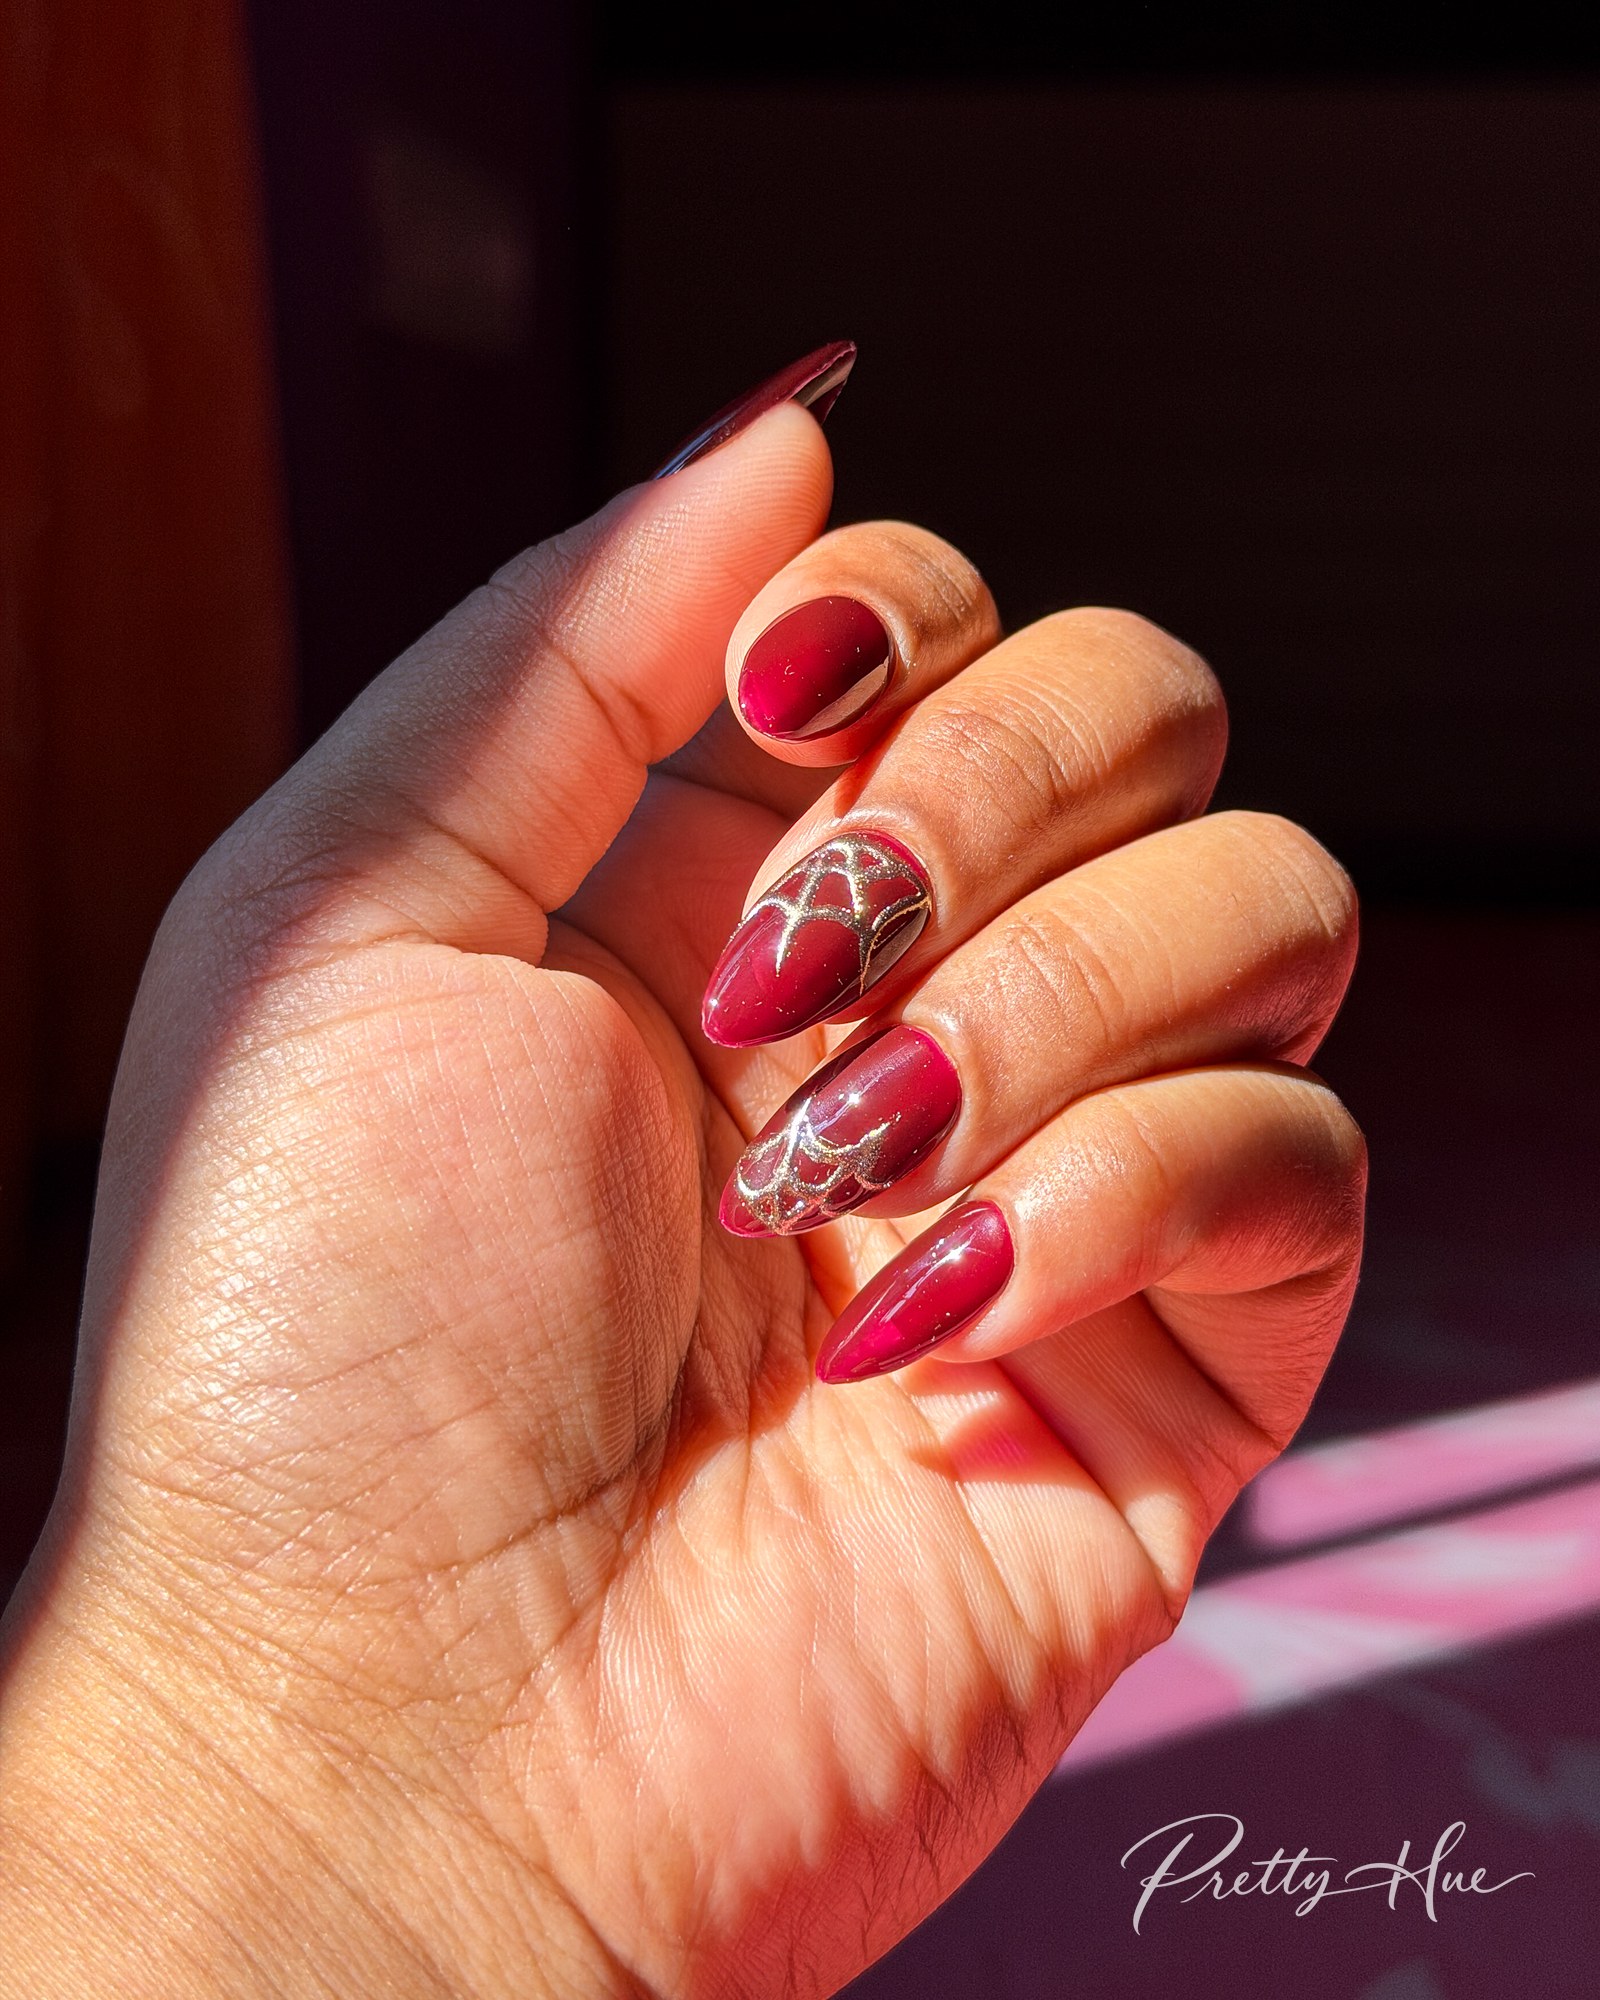
Shape Almond · Length Medium · Technique 3D clear gel + silver chrome · Time 40 min · Level Intermediate
My favorite way to do Halloween without going full costume. Glossy burgundy on every nail, with a fine raised silver chrome spider web at the base of two of them, so it still looks good in November. If you love deep reds, see my burgundy and brown fall nail designs.
How to paint it
- Brush on a thin layer of clear base gel to smooth the nail surface, then cure.
- Paint every nail in two thin coats of glossy burgundy gel, curing each coat.
- On the middle and ring fingers, brush on a Russian manicure matte top coat and cure. The matte surface makes the chrome powder easy to apply and stops it sticking anywhere except the web.
- Start the web with the spokes. Using a fine liner brush and clear nail gel, pick a point at the cuticle and pull four or five thin, straight lines out from it, fanning towards the middle and the sides of the nail like the ribs of an open fan.
- Add the threads. Close to the cuticle, join each spoke to the next with a small curved line that dips down towards the cuticle, so each gap looks like a tiny hammock. Then add a second and third row a little further up the nail, making each row slightly wider, so the web spreads out as it grows. Keep the lines thin and leave space between the rows so it looks delicate. The clear gel gives the web a raised, 3D look. Cure.
- Rub silver chrome powder over the web and cure again.
- Seal every nail with a glossy no-wipe top coat and a full cure.
2. Orange and matte black nails with tiny bats


Shape Square · Length Short · Technique Freehand + matte top coat · Time 1 hr · Level Intermediate
Bright orange with little black bats, next to velvety matte black. Alternating the two keeps it bold, and the tiny bats are easier to paint than they look. For more orange, here are 10 burnt orange nail designs I painted this fall.
How to paint it
- Brush on a thin layer of clear base gel to smooth the nail surface, then cure.
- Paint alternating nails burnt orange and black gel, two thin coats each, curing every coat.
- On the orange nails, paint tiny bat silhouettes in black gel with a liner brush: a small body with two pointy ears, and a wing on each side with pointed tips and the bottom edge curved inwards in little scallops. Fill each bat in solid black, and let a few run off the edge of the nail. Cure.
- Glossy no-wipe top coat on the orange nails, matte top coat on the black nails, and cure.
3. Pink ghost nails
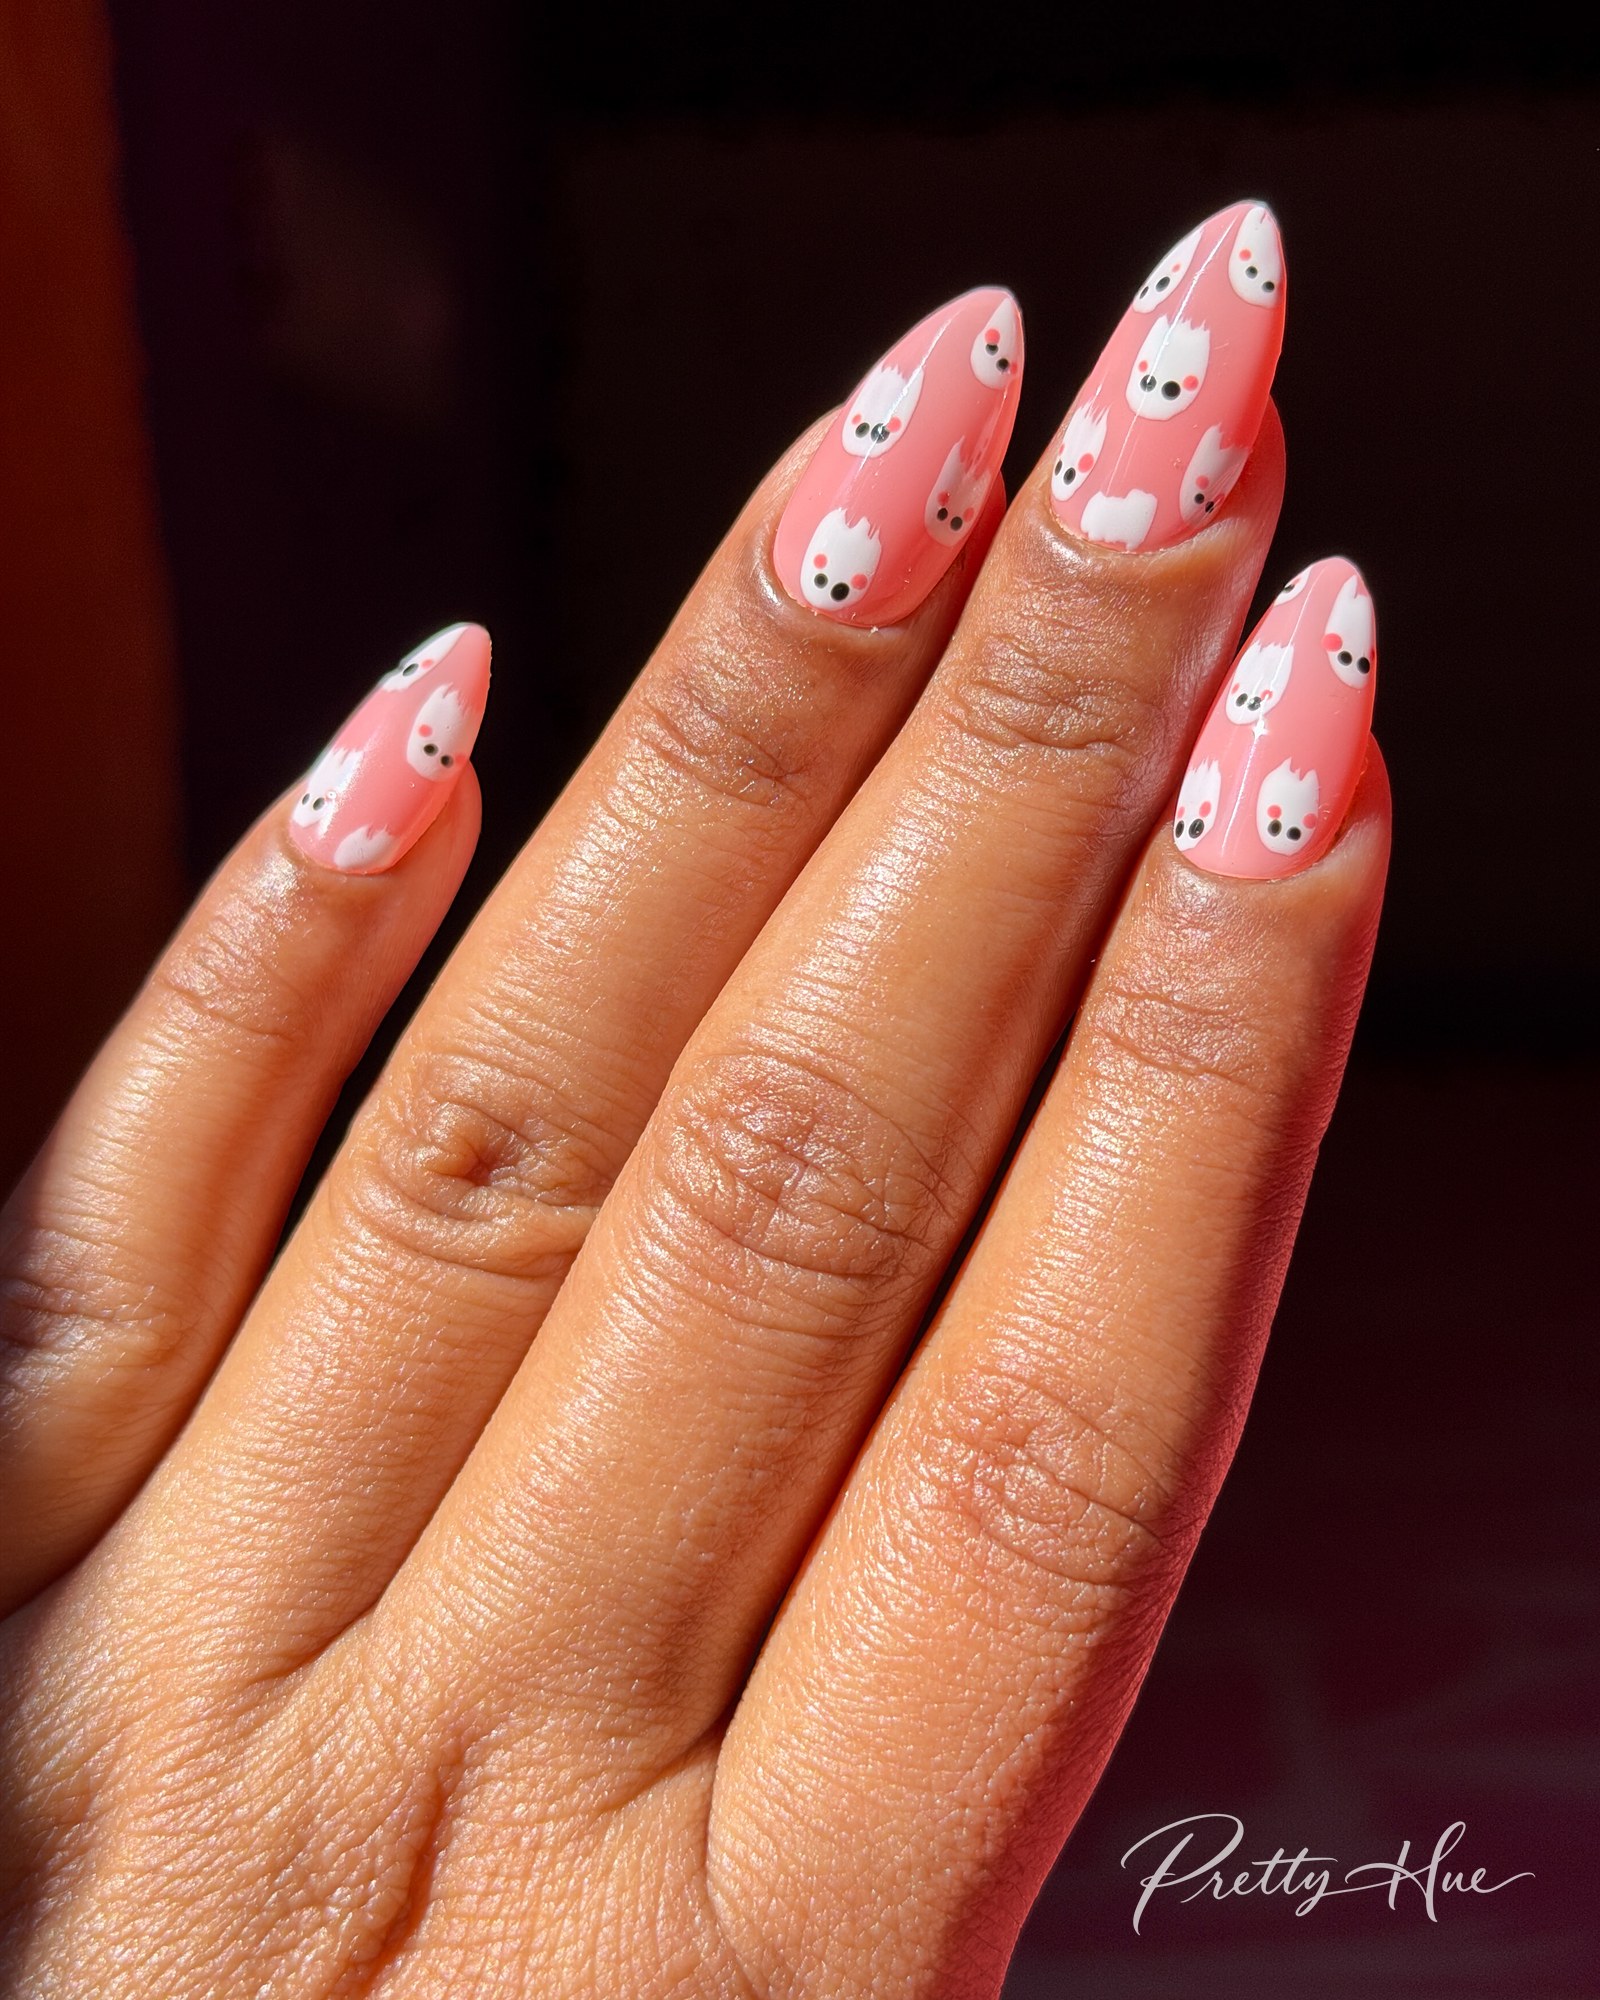
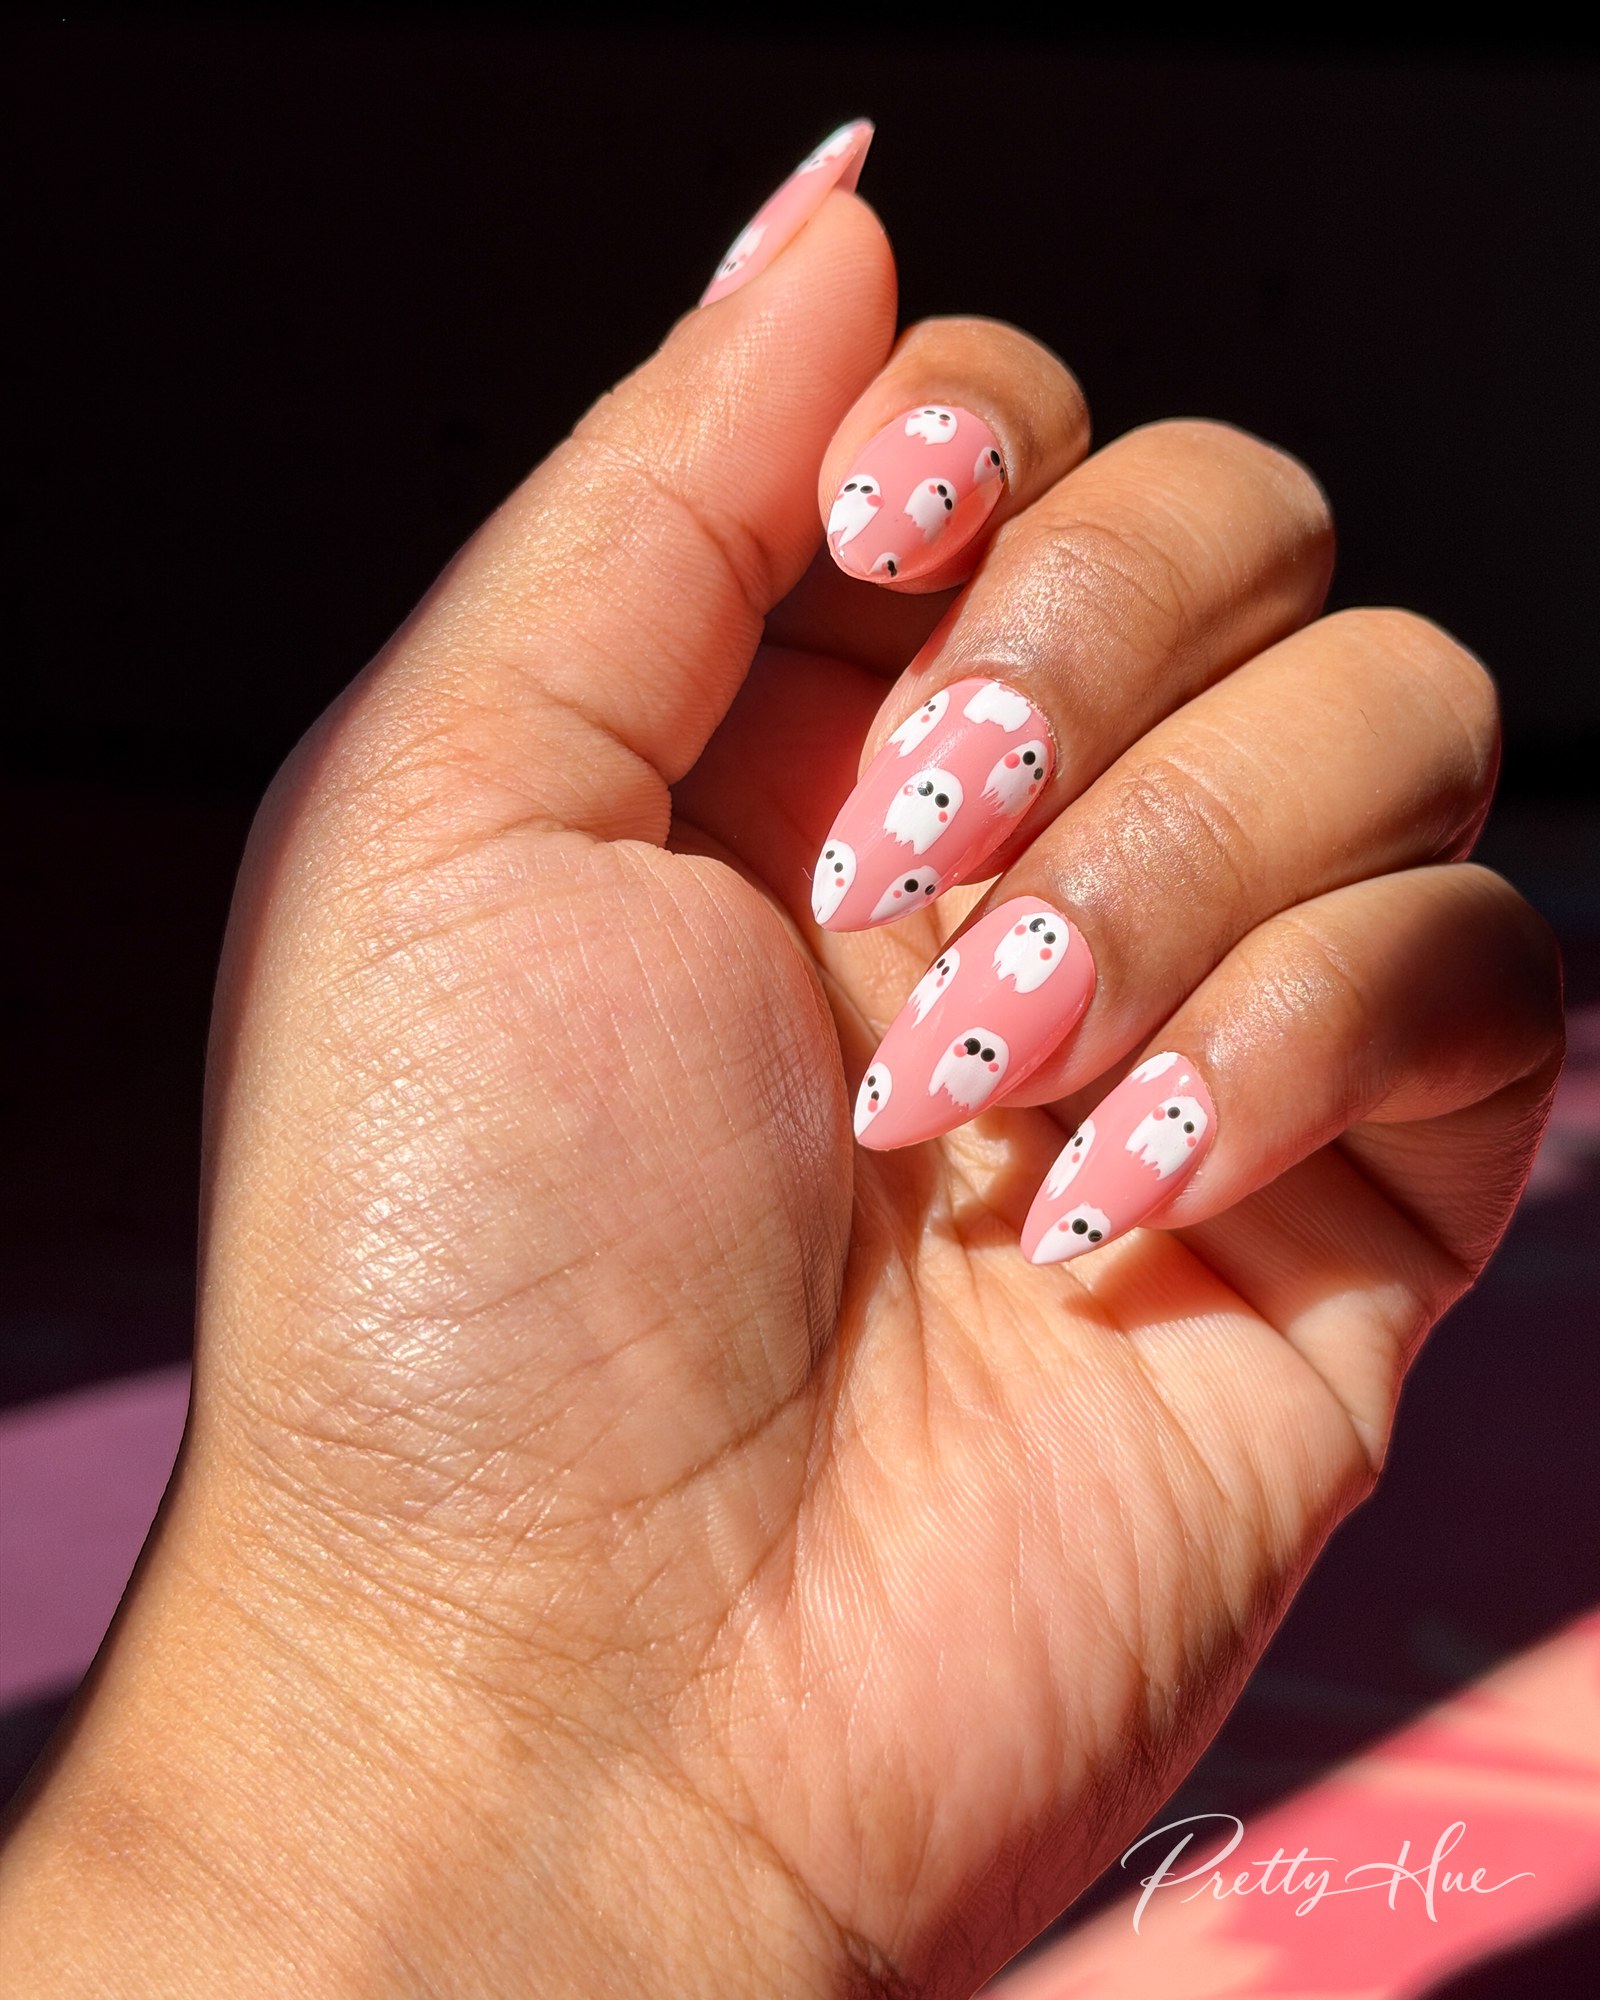
Shape Almond · Length Medium · Technique Dotting tool + Liner brush · Time 1 hr · Level Beginner
Cute instead of scary. A sheer pinkish nude base covered in tiny white ghosts is one of the easiest designs in this list and a good one to start with.
How to paint it
- Brush on a thin layer of clear base gel to smooth the nail surface, then cure.
- Paint every nail in two coats of sheer pinkish nude gel and cure.
- On every nail, paint small ghost shapes in solid white gel with a thin brush, using a few quick strokes. Don’t close off the bottom: leave each ghost a little unfinished at the end, so it looks like it’s floating. Cure.
- With a dotting tool and black gel, add two small dots on each ghost for the eyes, then cure.
- With pink gel, add a little blush on each ghost’s cheeks, then cure.
- Finish with a glossy no-wipe top coat and a full cure.
4. Black holographic chrome ghost nails

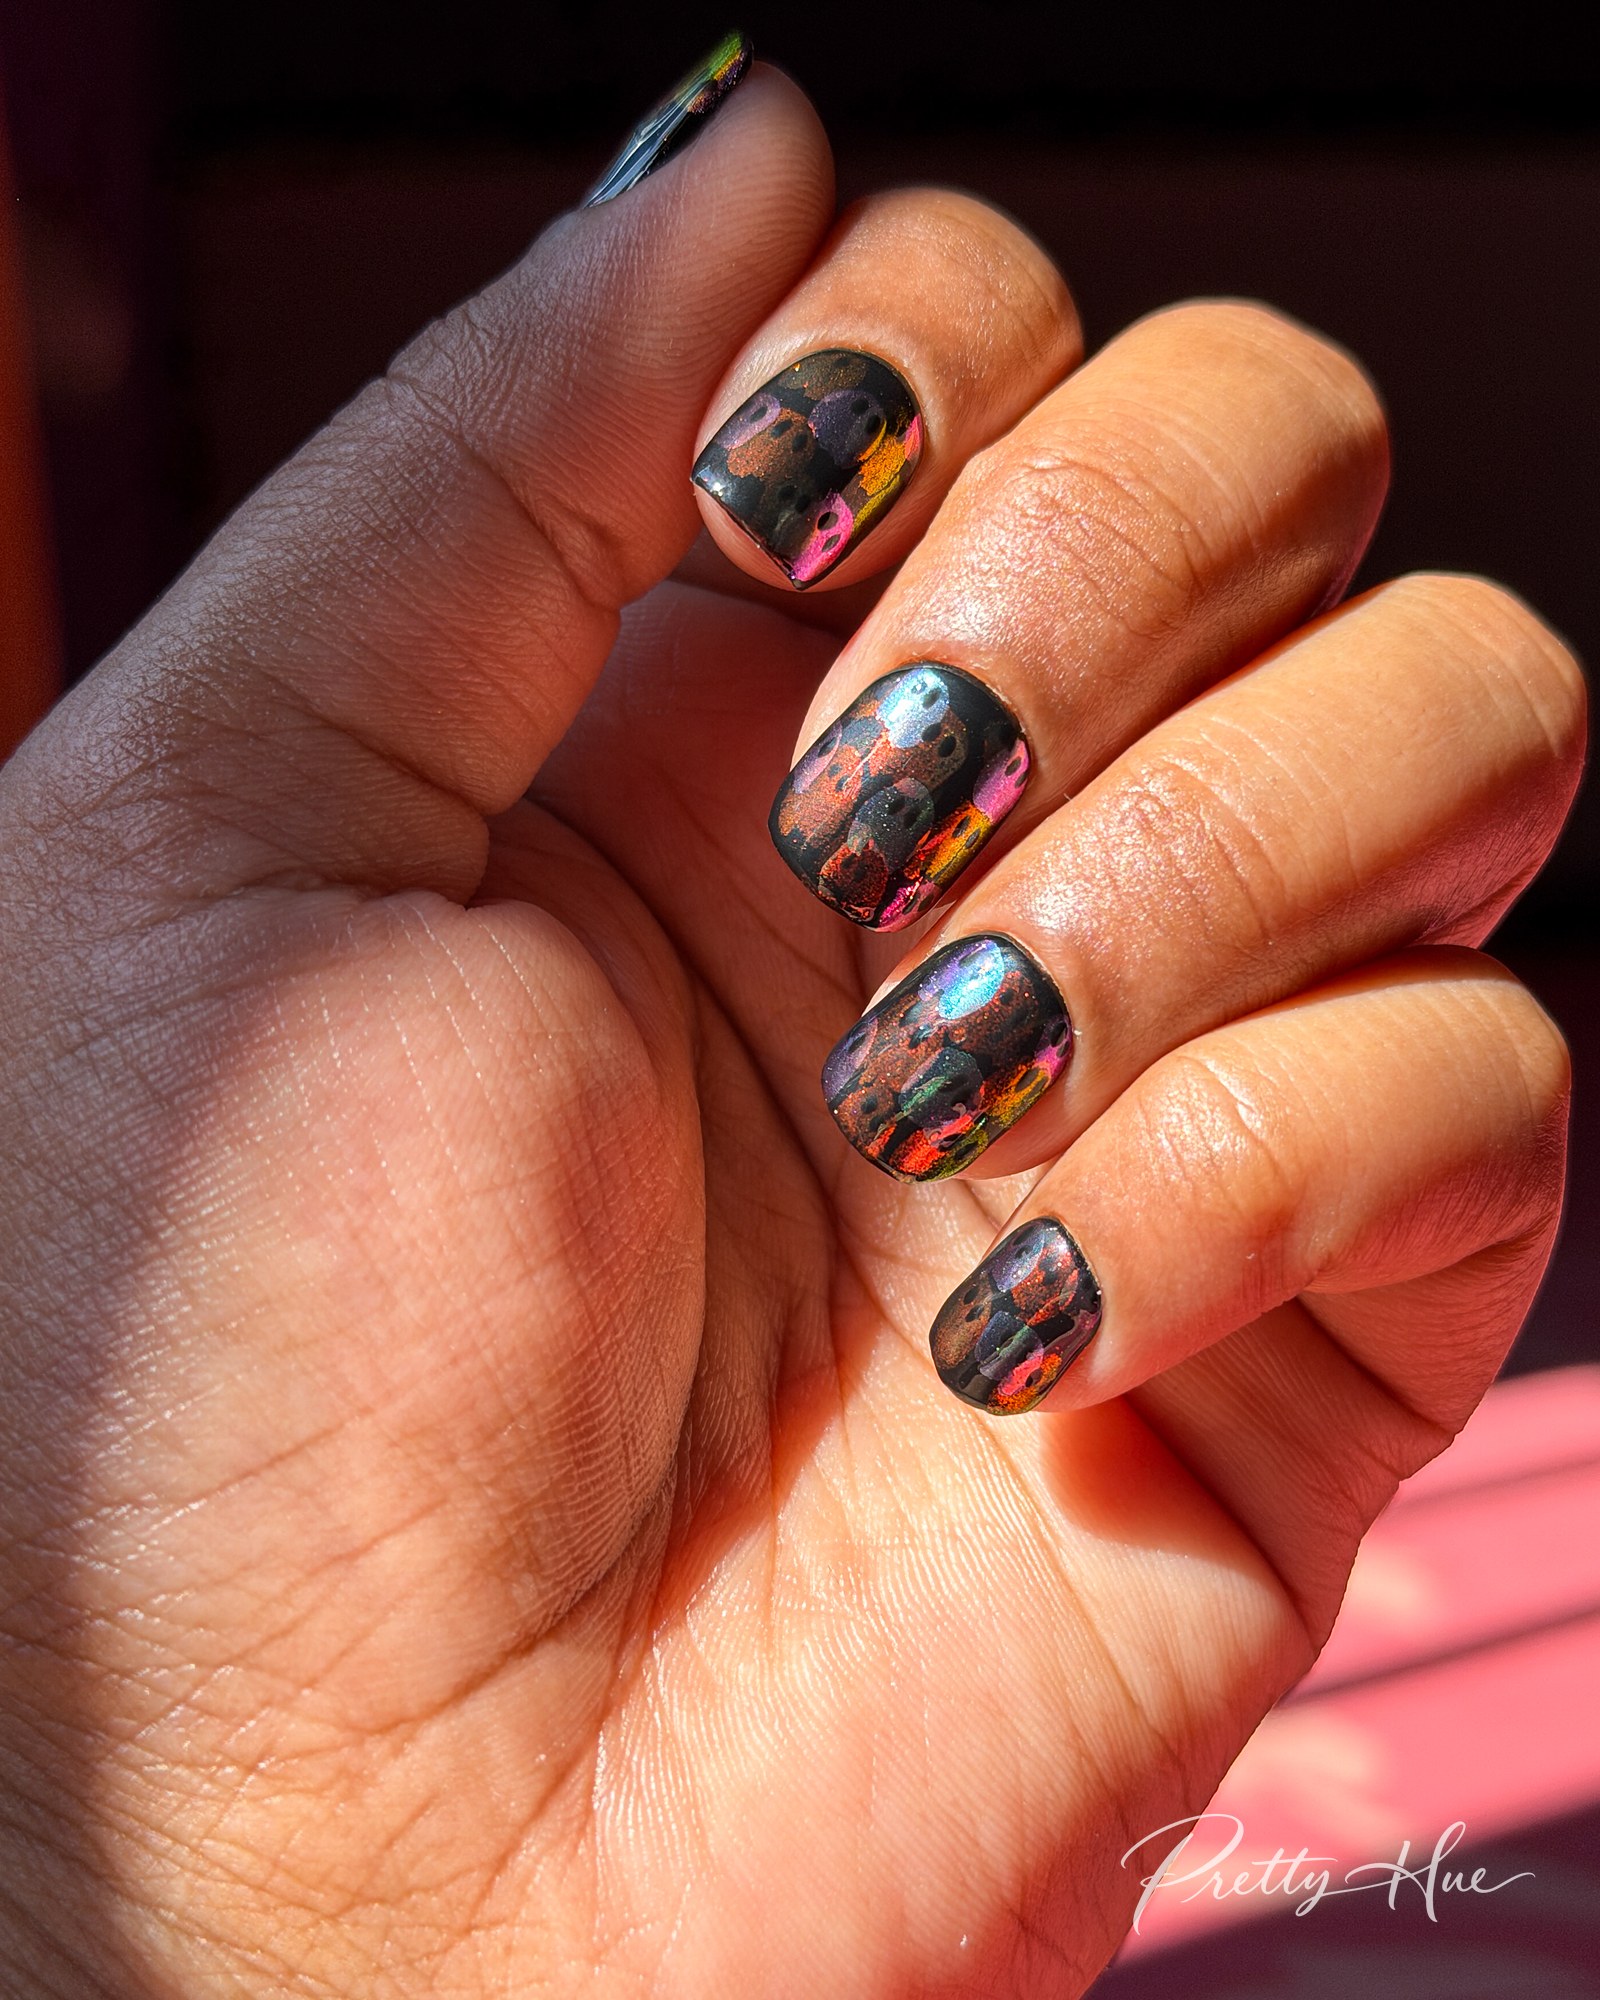
Shape Short square · Length Short · Technique Reverse holographic chrome · Time About 1.5 hr · Level Intermediate
Glossy black with shimmery holographic ghosts that flash orange, purple, blue and yellow every time your hand moves. Spooky, but still easy to wear.
How to paint it
- Brush on a thin layer of base gel and cure.
- Paint two coats of black gel polish, curing each coat.
- This set uses the reverse chrome method with two chrome powders. Rub the first chrome powder (aurora) over the cured black nails.
- With no-wipe top coat, draw tiny little ghosts in a random pattern on top of the chrome, leaving some space for the second batch of ghosts. Cure.
- Wipe off all the remaining chrome powder with acetone, so the aurora chrome stays only on the ghosts.
- Rub the second chrome powder over the nails. Then draw the second batch of ghosts in the empty spaces with the same no-wipe top coat and cure.
- Wipe off the leftover chrome with acetone again, so only the ghosts keep their shine.
- Paint the ghosts’ eyes with a tiny brush, then cure.
- Seal everything with no-wipe top coat and cure.
5. Red blood drip nails

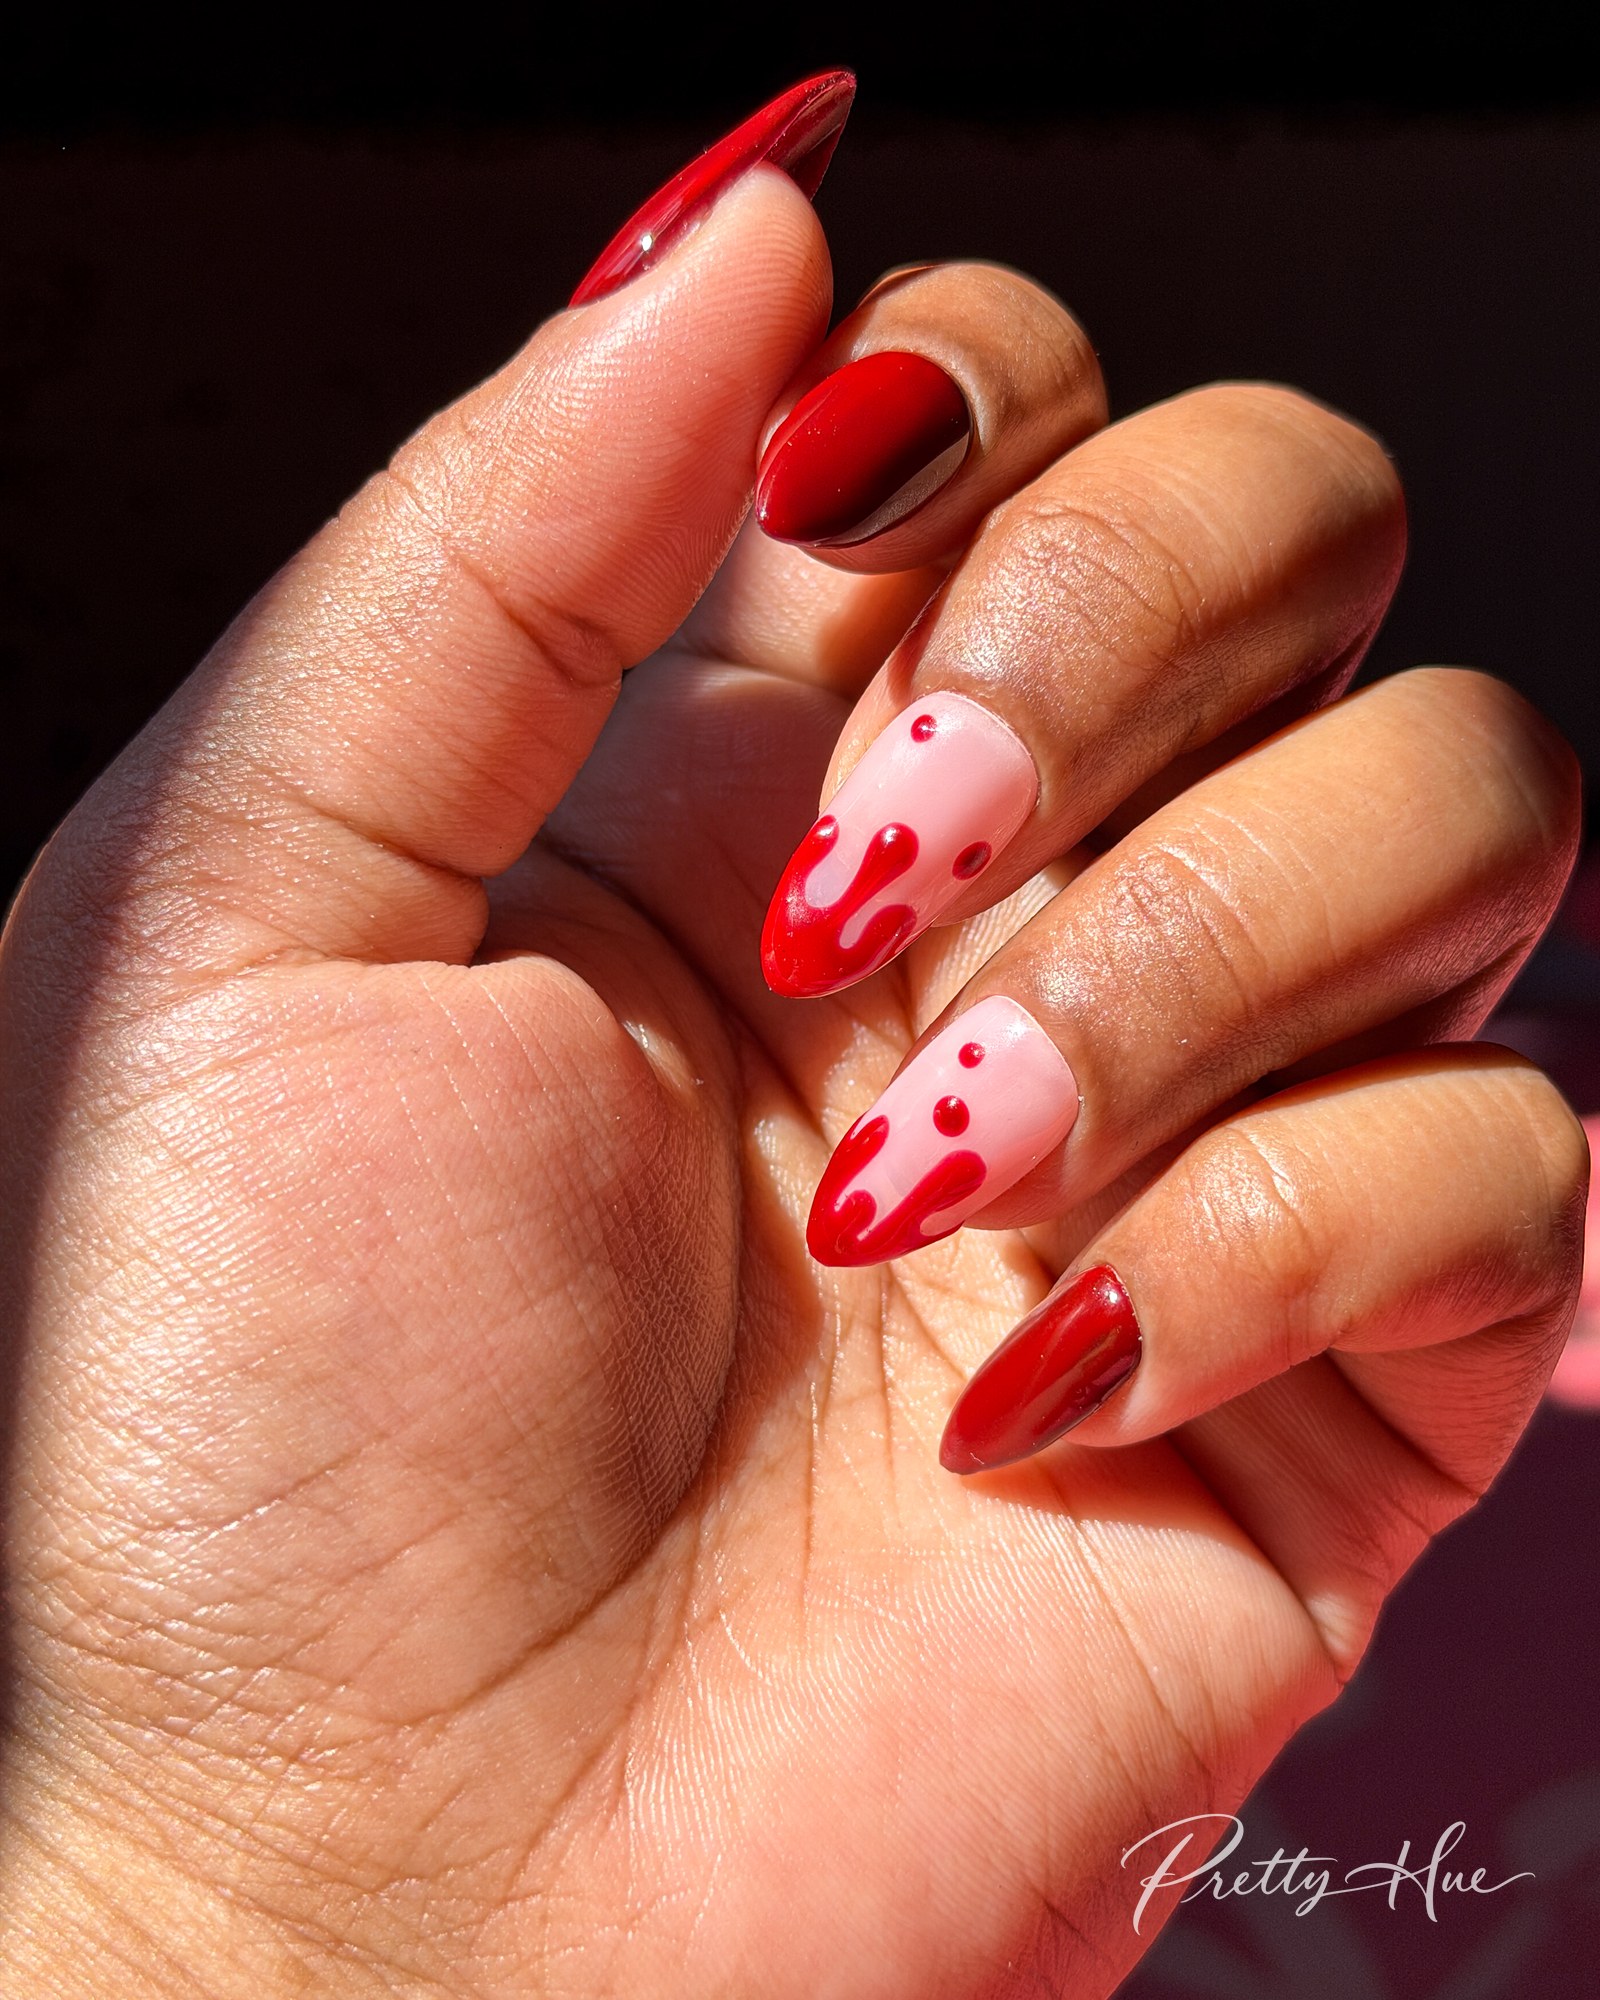
Shape Almond · Length Medium · Technique Freehand drips · Time About 1.5 hr · Level Intermediate
Dramatic, and the one people stop scrolling for. Glossy red drips run down from the tips over a sheer pinkish nude base on two nails, with plain glossy red on the rest.
How to paint it
- Brush on a thin layer of clear base gel to smooth the nail surface, then cure.
- Paint the thumb, index and pinky in two thin coats of glossy red gel, curing each coat.
- Paint the middle and ring fingers in a sheer pinkish nude gel and cure.
- With a small brush and the same red gel, paint a band along the tip of each accent nail, then pull wavy drips down towards the cuticle at different lengths, rounding off the end of each drip. Cure.
- Add two or three small red dots below the drips with a dotting tool, like drops that have just fallen, and cure.
- For a realistic 3D effect, trace over the drips again with clear nail gel, following the same pattern, so they look raised and full of depth. Cure.
- Finish every nail with a glossy no-wipe top coat and cure.
6. Candy corn French tips

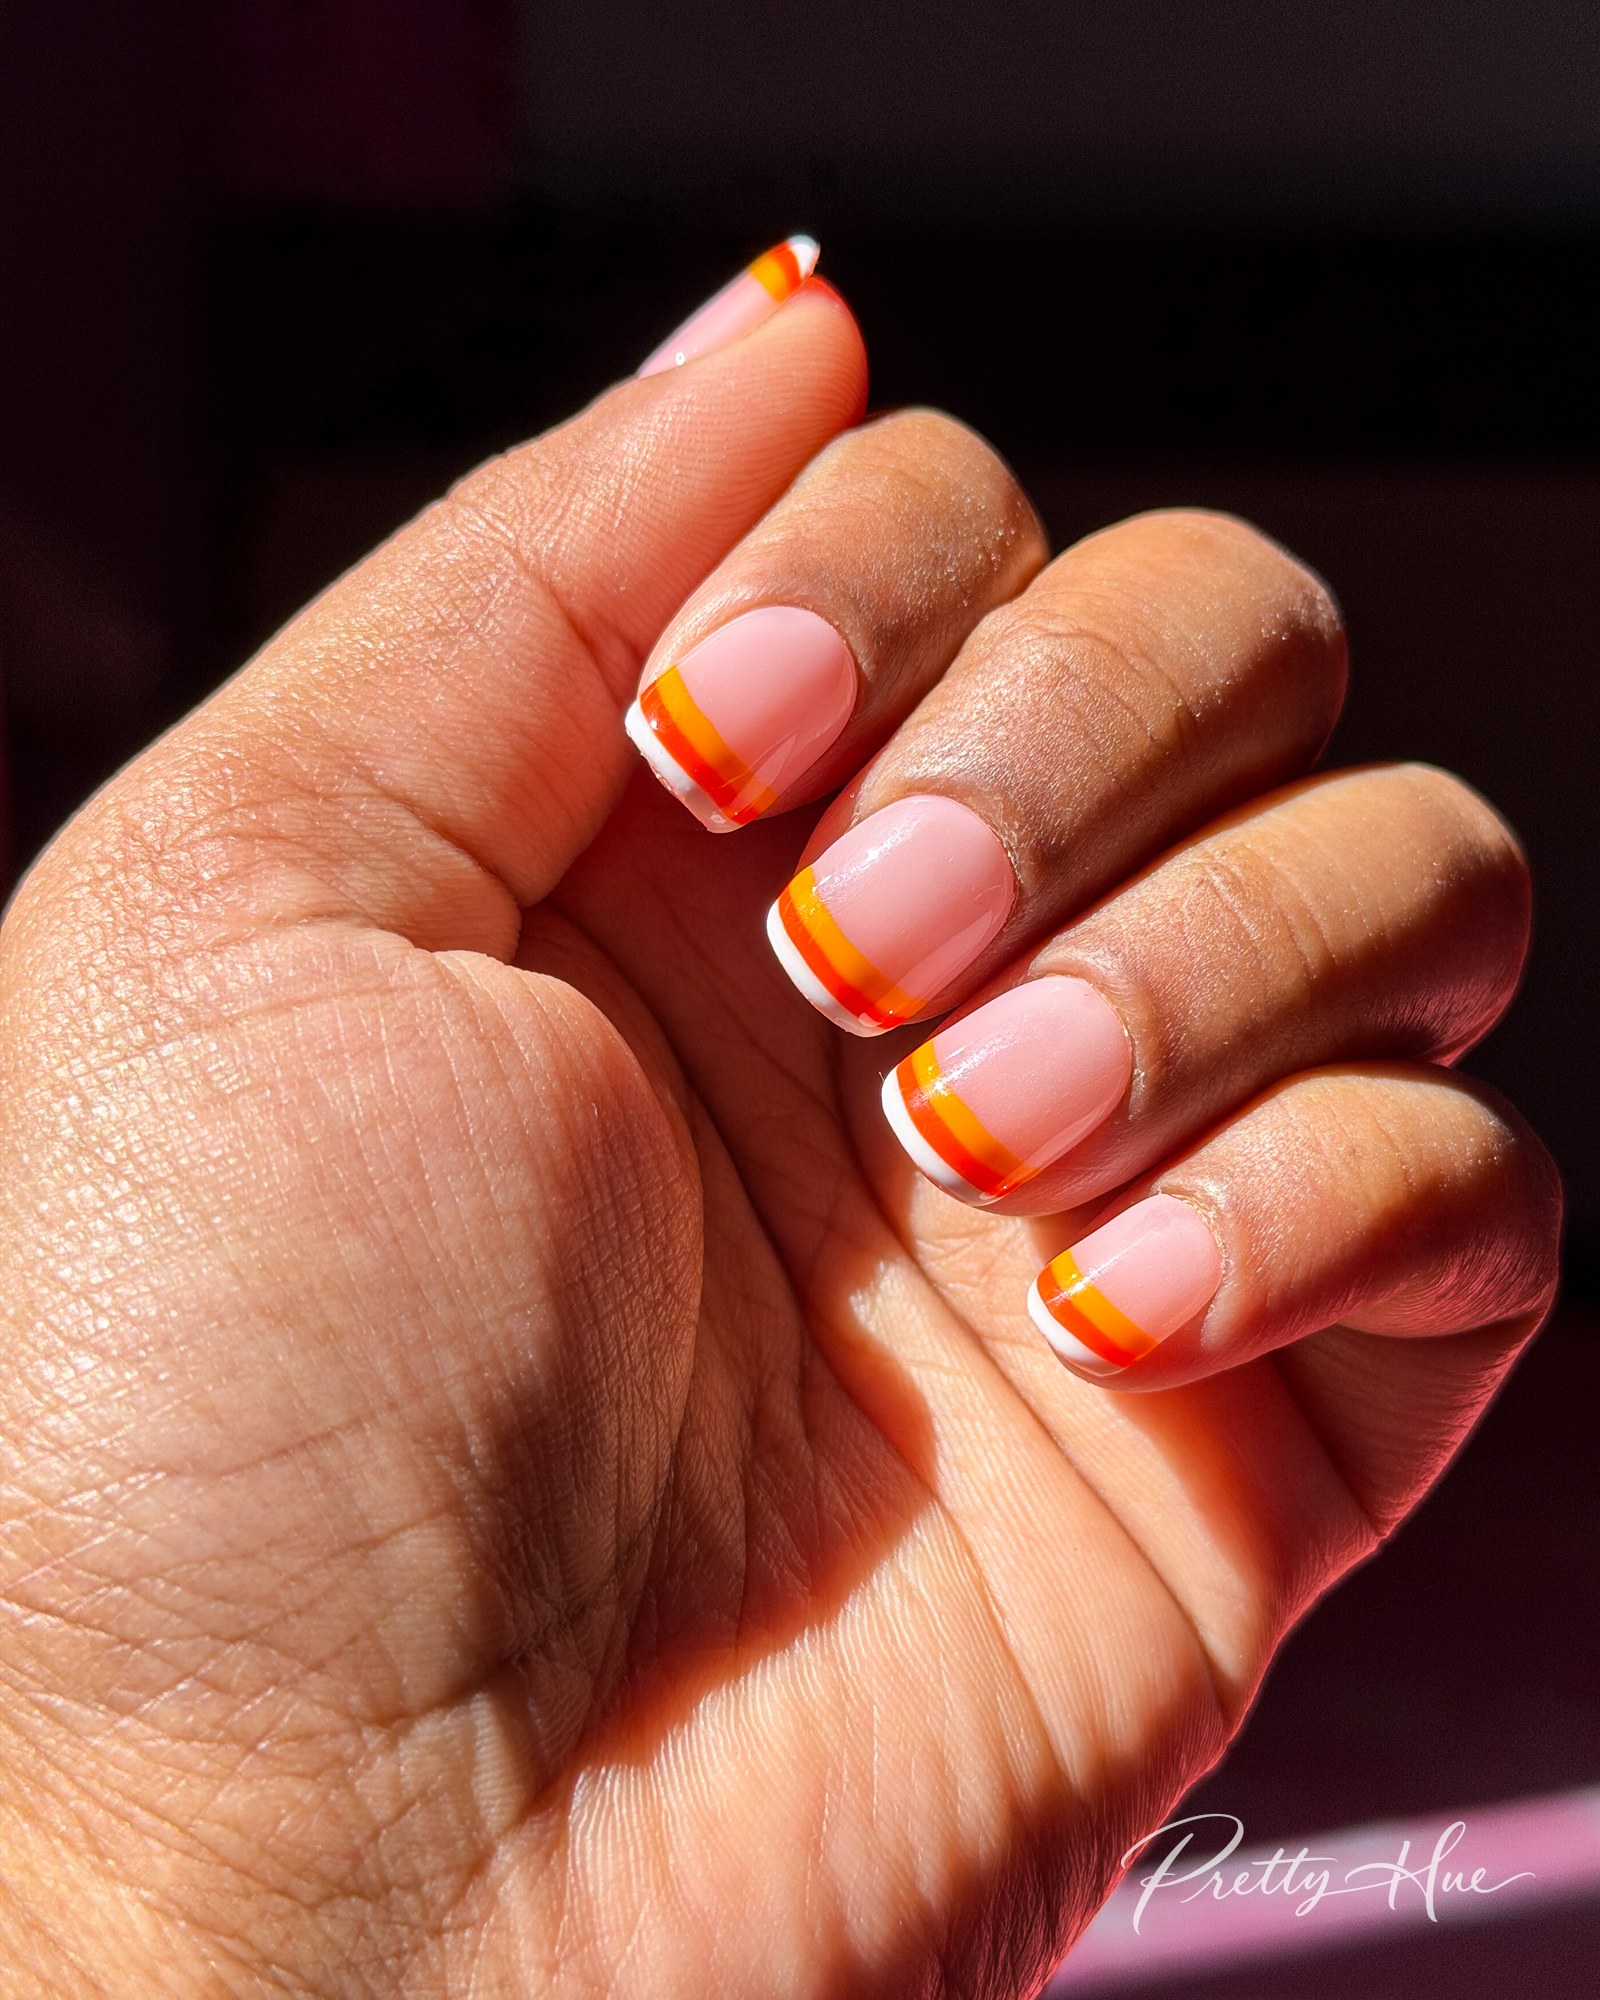
Shape Short square · Length Short · Technique French tip layers · Time 40 min · Level Beginner
A softer take on candy corn. White, orange and yellow-orange stripes sit only on the tips of short, sheer nude nails, so the rest of the nail stays clean and wearable.
How to paint it
- Brush on a thin layer of clear base gel to smooth the nail surface, then cure.
- Paint every nail in a sheer nude gel and cure.
- Paint a thin white French tip and cure. Right below it, paint a thin band of orange gel, the same width as the white, and cure.
- Add a thin band of yellow gel between the orange and the nude, then cure.
- Finish with a glossy no-wipe top coat and a full cure.
7. Black cat eye with a silver moon line

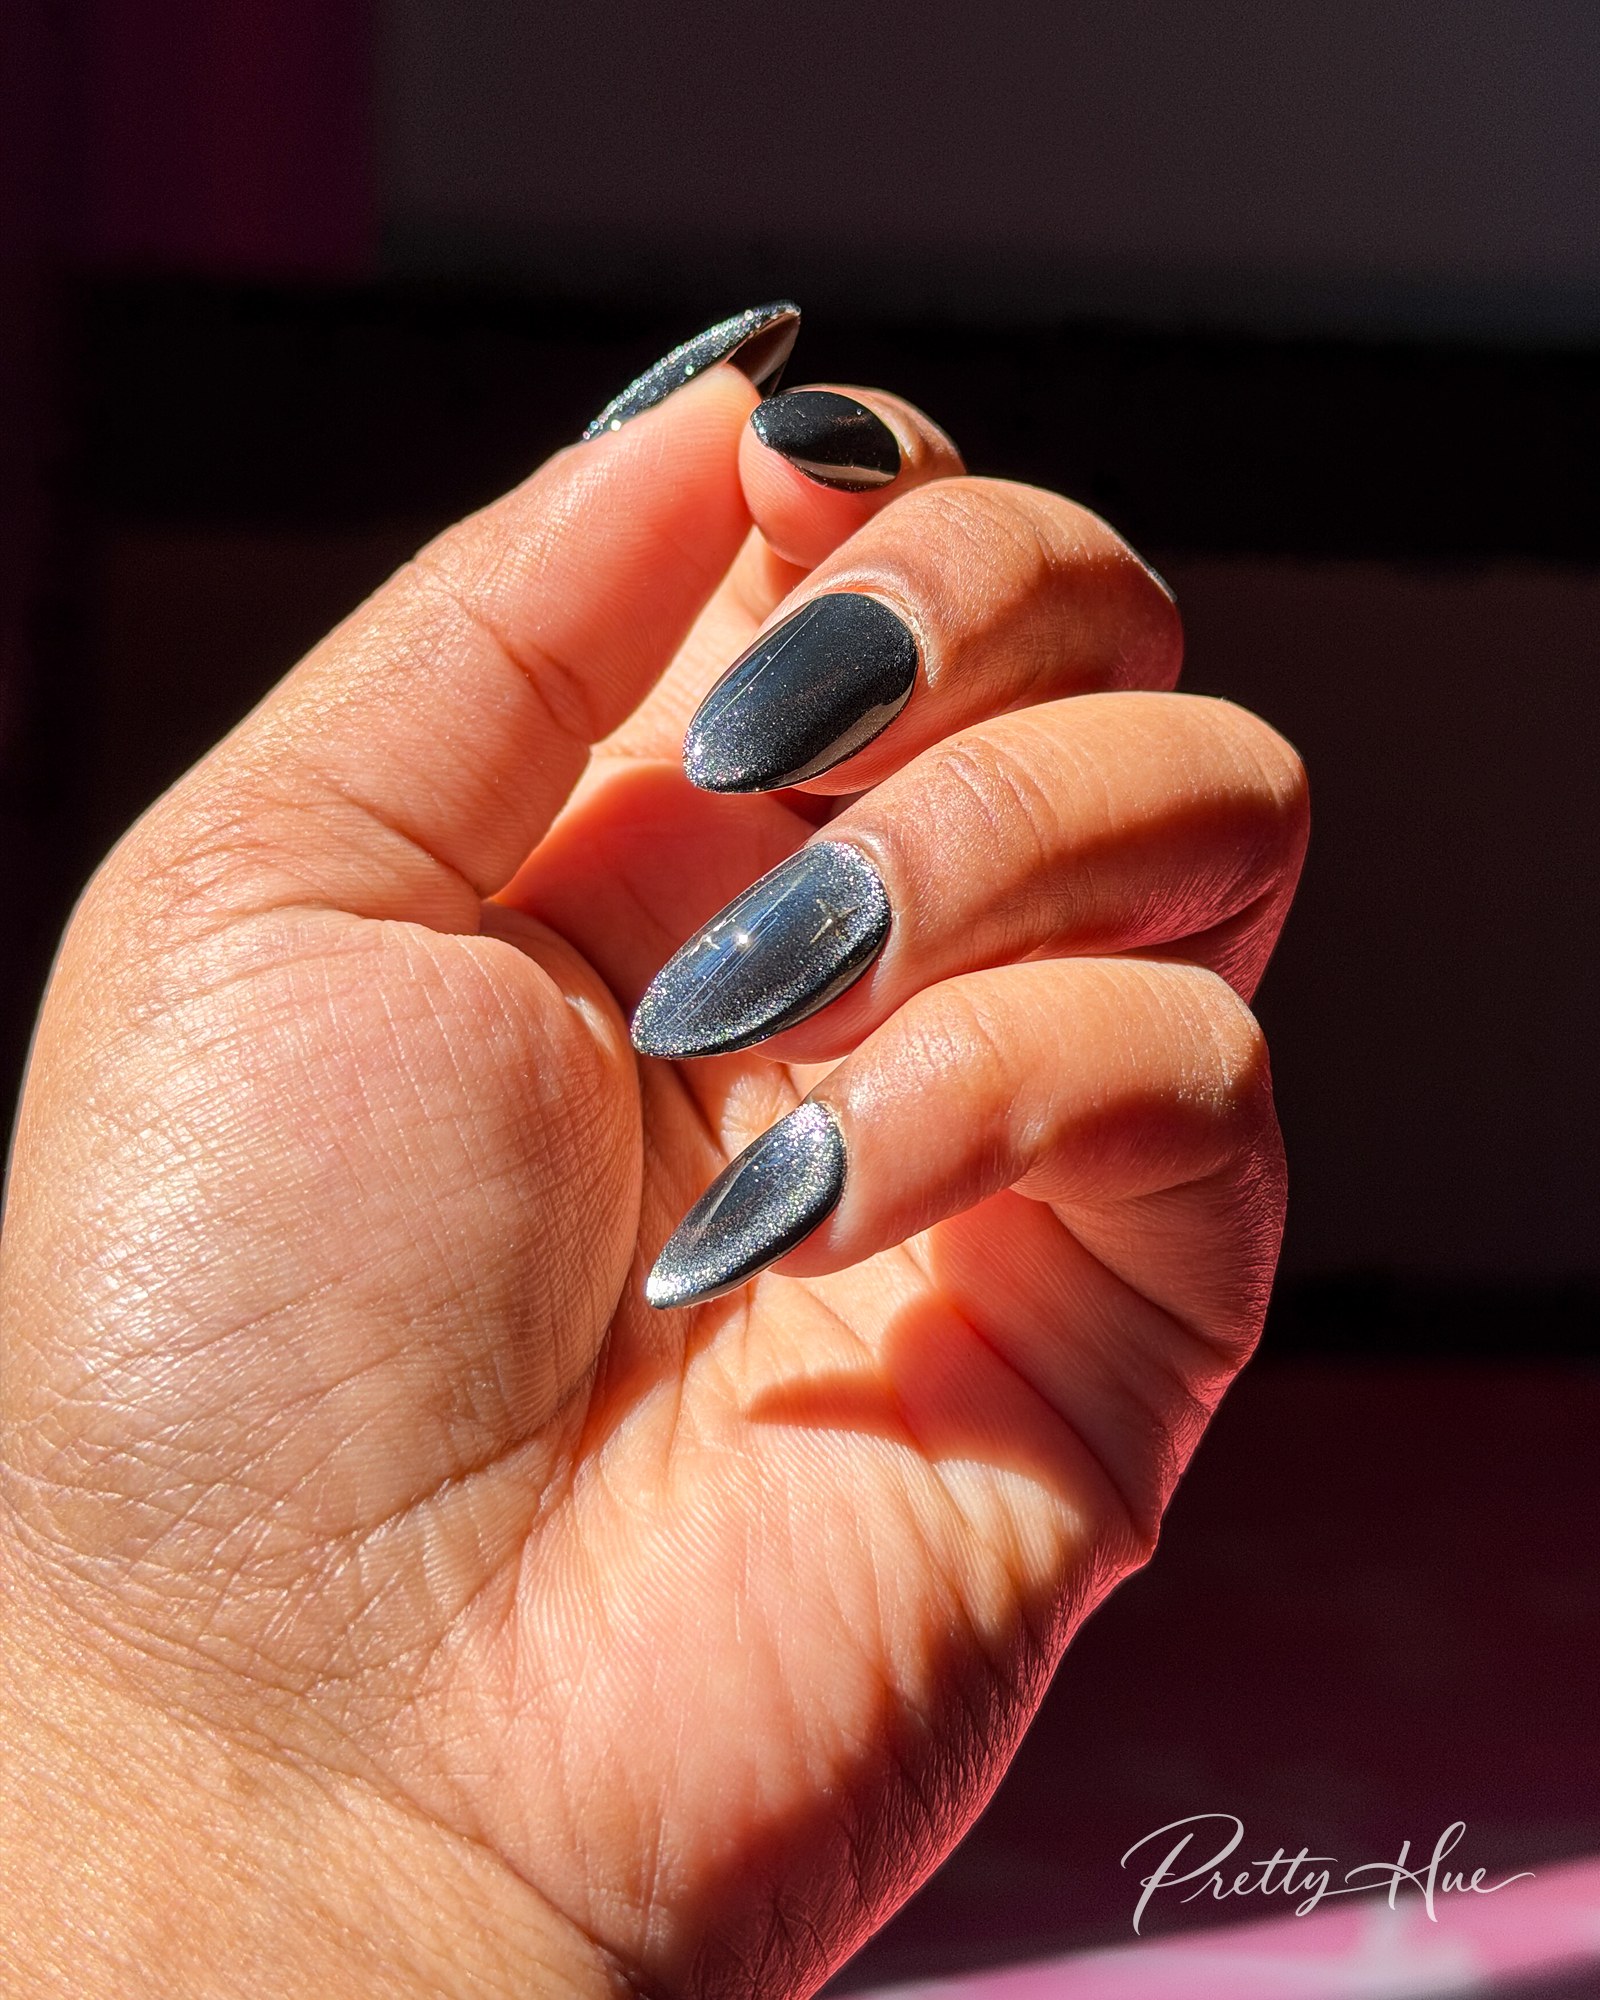
Shape Almond · Length Medium · Technique Cat eye + silver chrome stars · Time About 2 hr · Level Intermediate
Black cat eye pulled into one bright line across the nail looks like moonlight. Easy, moody, and it works for a Halloween party or just every day.
How to paint it
- Brush on a thin layer of clear base gel to smooth the nail surface, then cure.
- Paint two coats of black gel, curing each coat.
- Paint one coat of silver magnetic cat eye gel. Before curing, hold the magnet close to the nail to pull the shine into a thin crescent line.
- Cure straight away so the line stays sharp.
- Once the cat eye is cured, take the ring finger only and mattify that nail with a Russian matte top coat. Draw a few tiny stars on it with no-wipe top coat and cure. Wipe the nail with a little acetone so the chrome powder goes on easily, then rub silver chrome powder over the stars.
- Finish with a glossy no-wipe top coat and a full cure.
8. Orange nails with a 3D pumpkin accent

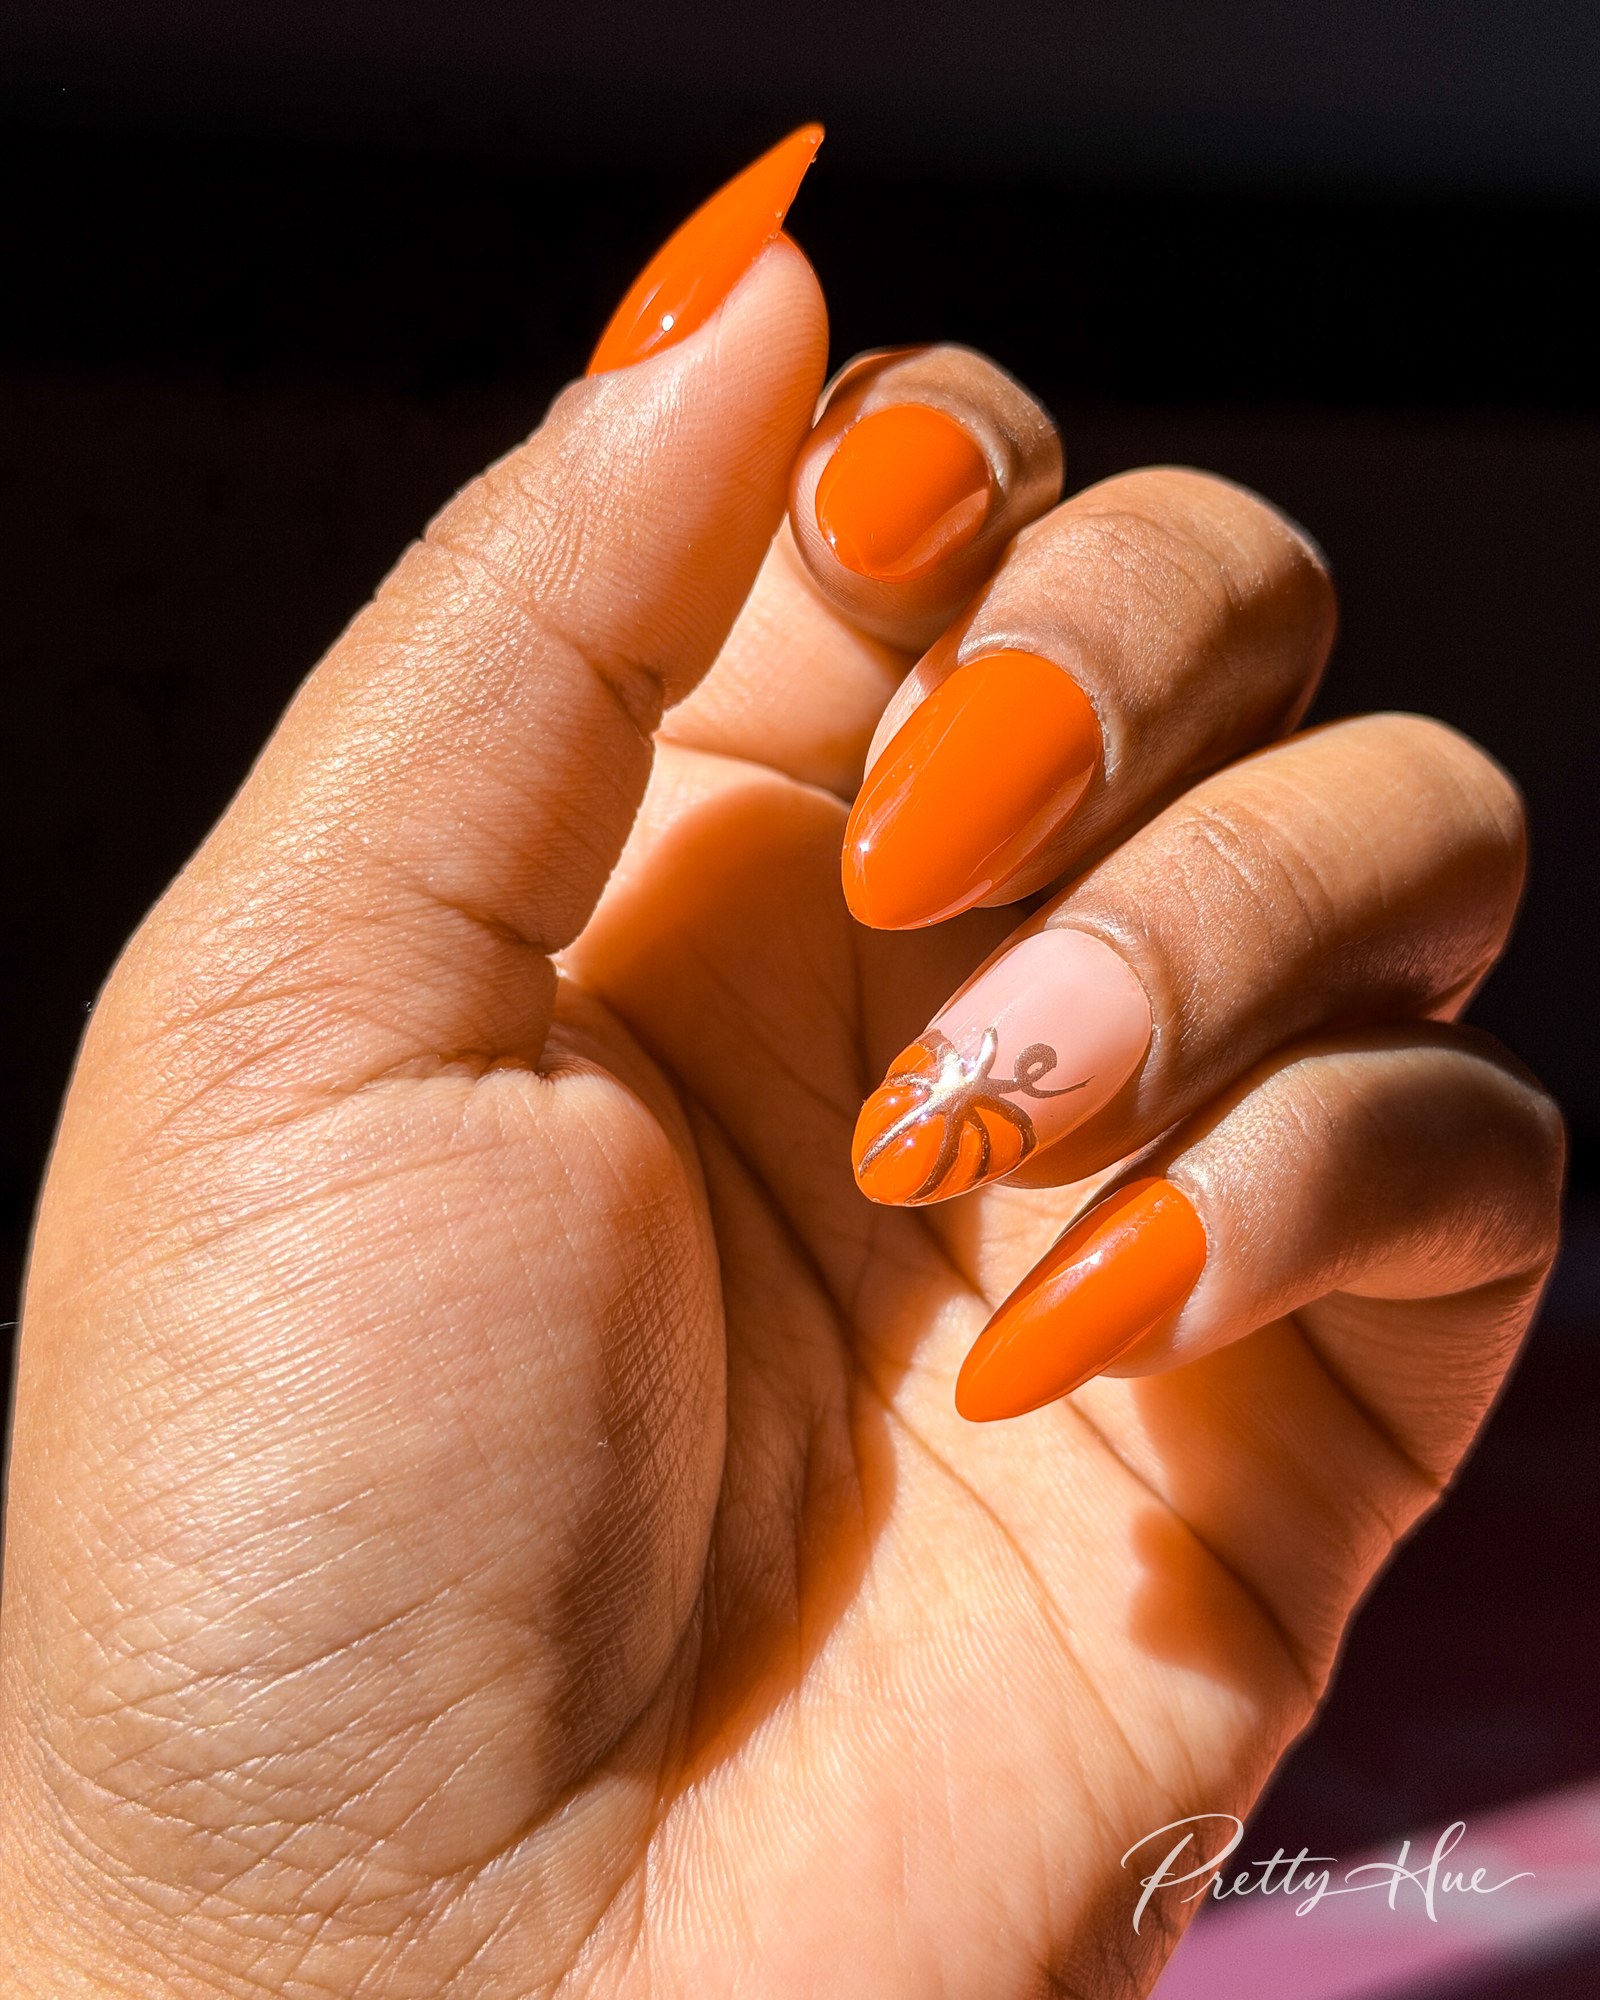
Shape Almond · Length Medium · Technique 3D pumpkin accent · Time About 1 hr · Level Beginner
Glossy warm orange on four nails, and one sheer nude accent nail with a raised 3D orange pumpkin at the tip and a curly vine. Fun, but still easy to wear all through October.
How to paint it
- Brush on a thin layer of clear base gel to smooth the nail surface, then cure.
- Paint the thumb, index, middle and pinky in glossy warm orange gel, two coats, curing each coat. Paint the ring finger in a sheer pinkish nude gel and cure.
- On the ring finger, paint a small pumpkin right at the tip in the same warm orange gel and cure.
- On the ring finger, mattify the nail with a matte top coat. Outline the pumpkin, its curved segment lines, the stem and the curly vine with no-wipe top coat, then cure. Wipe the nail with a little acetone so the chrome goes on easily, press gold chrome powder onto the lines with a sponge and dust off the excess. Then add clear nail gel over the pumpkin to build up the ridges so it looks more realistic, and cure.
- Finish with a glossy no-wipe top coat and a full cure.
9. Orange and black mismatched nails with a checkerboard accent


Shape Short square · Length Short · Technique Checkerboard · Time About 2 hr · Level Intermediate
Bright orange, glossy black, a black and white checkerboard, Frankenstein-style stitches on orange and an orange and black striped thumb. Every nail is different, but together it reads as pure Halloween.
How to paint it
- Brush on a thin layer of clear base gel to smooth the nail surface, then cure.
- Paint the index and pinky in bright orange gel, and the thumb, middle and ring fingers in black gel. Two coats each, curing every coat.
- Ring finger: with a liner brush and white gel, paint a checkerboard of white squares over the black, every other square filled in. Work row by row and cure.
- Index finger: with a fine liner brush and black gel, draw one long curved line across the nail, then add short cross lines over it so it looks like Frankenstein-style stitches. Cure.
- Thumb: with the liner brush and orange gel, paint thin orange stripes from the cuticle to the tip over the black. Cure.
- Finish every nail with a glossy no-wipe top coat and a full cure.
What are the easiest Halloween nails for beginners?
Pink ghosts and candy corn French tips are the easy Halloween nails I would start with. The ghosts are loose white strokes left unfinished, with dot eyes from a dotting tool, and the candy corn tips are just three thin bands of colour at the edge of the nail.
Can you do Halloween nails on short nails?
Yes, and they often look better short. Keep the art on one or two accent nails and paint the rest in a solid color like burgundy or black. Short square and short round shapes both work well.
How do I make Halloween nails look classy?
Stick to a dark, rich base like burgundy, black or burnt orange, keep the details small, and finish with a glossy top coat. A single spider web or a fine cat eye line feels a lot more grown-up than a full set of characters.
Whichever one you pick, these easy Halloween nails all come down to the same few basics: a thin base gel, a fine liner brush and a little patience between cures. Save this post for next October.

